Showing posts with label 4th grade. Show all posts

Saturday, April 30, 2016

Kaleidocycles


To start the new  month I thought I'd share my end of the year project for my 4th & 5th graders.


Behold the kaleidocycles!

I was first introduced to this magical contraption in middle school. It was my favorite project I completed in 8th grade.  It had stuck out in my mind all these years and I was so stoked to finally teach it!
BUT since my 13 year old brain was too busy pining over teenage whatever's, I forgot what thoses paper, spinning, triangle, thingies were really called!


So began the search, and after 4 years the Pinterest gods answered my prayers!


I watched a lot of instructional vids and examined print outs, but figured out some easy measurements to make this successful for my elementary students.

You will need:
-thick paper, we used poster board this year but construct or cardstock is better
-a ruler
-pencils & color pencils
-glue, we used a glue gun on the poster board


Lets Begin!

You start with a number line across the bottom of your paper. We worked in 4 inch sections, on a 24pt scale.
You should have seven points: 0,4,8,12,16,20,24.

Now we are going to measure up. For rows 0, 8, 16, and 24, we will make a dot at 4 inches and 8 inches. So we are skipping every other row.

Now for the three remaining rows; 4, 12, and 20, we will make dots at 2 inches, 6 inches and 10 inches. These rows will be taller and the dots should appear in the middle spaces of the surrounding rows.

Now use your ruler to connect the dots in vertical lines, don't worry about the 0 row.

Now we are going to create a series of Five diagonal lines.
1: Starts at the top 10 of Row 4 and taking it back to the top 8 of Row 0. 
2: Starts at the top 10 on Row 12 and goes back 8 of Row 8, 6 of Row4, and ends with 4 of Row 0.
3: The longest, starts at the top 10 of Row 20 and going back 8 R16, 6 R 12, 4 R 8, 2 R4 and ending with 0 R0.
4: Starts at the top 8 of Row 24, going back to the 6 R20, 4 R16, 2 R12, ending at the 0 R8.
5: The last connects the middle 4 of Row 24, to 2 R20 and ends at 0 R16.

I promise it's easier once you start doing in than all that above talk makes it sound. Once the students get the rhythm going it will be easy to keep the pattern.

Now repeat backwards! Starting at the top 10 of Row 20.
1: 10 R20 to 8 R24.
2: 10 R12 to 8 R16, to 6 R20, ending at 4 R24.
3: 10 R4 to 8 R8, to 6 R12, to 4 R16, to 2 R20, ending at the 0 R24.
4: 8 R0 to 6 R4, to 4 R8, to 2 R12, ending at 0 R16.
5: The Last! 4 R0 to 2 R4, ending at 0 R8.
Draw past the 24 row to create the tabs.


Now you can decorate! We used prismacolor pencils and construction paper crayons. Stay clear or markers, it makes the paper too soft!


The kaleidocycles has 4 rows for decorating and a 5th half row where it glues together.
For the best results repeat the same pattern across each row.


When finished, cut off extra paper.

Fold along all the diagonal lines.
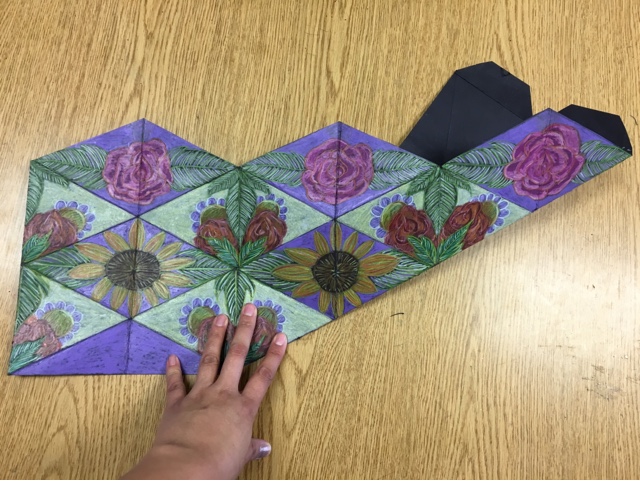
Both directions.

Then fold along all the vertical lines, paper fan style.

If folded right it will easy roll into a tube, connecting the 1st over the 5th row.

Once the tube is glued together, we used a glue gun to quicker results, you insert the tabs into the open end to form a circle. 

Let dry well before trying to spin or it will pop open!

Now enjoy! 


Friday, February 19, 2016

A Dog That's More Than Blue


Blue Dog is an art teacher staple. The wide eyed pup by Cajun artist George Rodrigue has traveled  all over the world and to many classrooms.  I find it's a fun lesson to pull out when classes are losing motivation after the holidays.

For one, it's a dog, and kids love dogs! And two, the students can really have some fun making Blue Dog tell a story. This gives me an idea of whats current in their minds, a great tool for developing future lesson plans to meet their interest.

Here are a few of my favorite examples from this year.


A new edition to this lesson was the creation of a MEGA blue dog, that accompanies the artwork in the hallway! Thank the art gods for butcher paper and the lamination machine!


Happy Friday!

Sunday, January 17, 2016

Pulled from Pinterest: Totem Spoons


So I do what every art teacher does when I'm tired of all my lesson plans and fresh out of ideas, hit up Pinterest.

Usually within second my brain has kicked back into over drive and I'm filled fresh energy, becoming inspired by all the innovative art teachers, and the work their students are producing.

Most of the time I take the inspiration and remold it to meet my students interests.

But other times, I borrow straight from above! Taking a lesson meant for middle school or high school and give it to my little ones and see what they can do! 

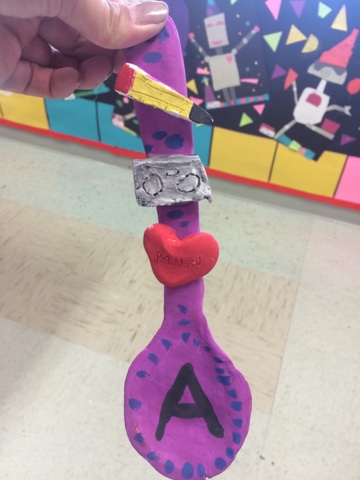
Here's my 4th graders take on Totem Spoons.


We built them with recycled clay, hence the dual color.


And painted them with tempera cakes, water colors work too.


And as an extra incentive I let the kids "spray paint" their finished product with a fixative!
Nice for a first try! 

Thursday, November 12, 2015

Heads on Hollyhock

I

For TBT today I'm taking a look back at one of my favorite lessons from last fall. I wanted something with a southwestern theme, and stumbled across a Pinterest Georgia O'Keeffe lesson. Liking the idea and being inspired by a book I had just read that was all about floriography (the symbolic language of flowers), I set out to teach something new. 

We spent the first day learning about O'Keeffe, her inspiration for the ram head series, and juxtaposition.

Then we drew the skull.


On the second day we talked about flowers and how each flower has a meaning. For example O"Keeffe uses a Hollyhock beside her skull, represent ambition. As part of their project,each student had to pick a flower to incorporate with there skull that sent a message about themselves.

The end results we beautiful.


Monday, November 2, 2015

Sugar Skulls

Dia de los Muertos came quickly this year as other projects took longer than projected, that I almost decided to let it go. But it's my favorite and instead decided to focus on Calaveras, or Sugar Skulls. Here is what my amazing kiddos accomplished in three classes.


3rd grade worked on paintings...

Day 1: consisted of the shapes it takes to make a skull and laying down the first layer of color.


Day 2: we painted a black outline, focusing on traditional symbols, such as flowers, hearts, crosses and spiderwebs.


Day 3: was the fun day, adding the colors. We discussed how these skulls needed to look like they were made out of candy, and to decorate them like a cake or cookie, with delicate touches.


4th grade followed the same schedule, only their first day consisted of paper mache' and ended with glitter! Perks of advancing in art skills each year, evolving in materials!


Aren't they sweet?!
Happy Monday!