To start the new month I thought I'd share my end of the year project for my 4th & 5th graders.
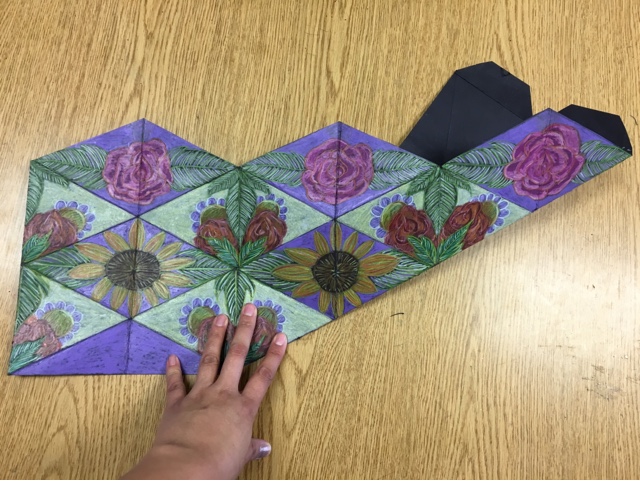
Behold the kaleidocycles!
I was first introduced to this magical contraption in middle school. It was my favorite project I completed in 8th grade. It had stuck out in my mind all these years and I was so stoked to finally teach it!
BUT since my 13 year old brain was too busy pining over teenage whatever's, I forgot what thoses paper, spinning, triangle, thingies were really called!
So began the search, and after 4 years the Pinterest gods answered my prayers!
I watched a lot of instructional vids and examined print outs, but figured out some easy measurements to make this successful for my elementary students.
You will need:
-thick paper, we used poster board this year but construct or cardstock is better
-a ruler
-pencils & color pencils
-glue, we used a glue gun on the poster board
You start with a number line across the bottom of your paper. We worked in 4 inch sections, on a 24pt scale.
You should have seven points: 0,4,8,12,16,20,24.
Now we are going to measure up. For rows 0, 8, 16, and 24, we will make a dot at 4 inches and 8 inches. So we are skipping every other row.
Now for the three remaining rows; 4, 12, and 20, we will make dots at 2 inches, 6 inches and 10 inches. These rows will be taller and the dots should appear in the middle spaces of the surrounding rows.
Now use your ruler to connect the dots in vertical lines, don't worry about the 0 row.
Now we are going to create a series of Five diagonal lines.
1: Starts at the top 10 of Row 4 and taking it back to the top 8 of Row 0.
2: Starts at the top 10 on Row 12 and goes back 8 of Row 8, 6 of Row4, and ends with 4 of Row 0.
3: The longest, starts at the top 10 of Row 20 and going back 8 R16, 6 R 12, 4 R 8, 2 R4 and ending with 0 R0.
4: Starts at the top 8 of Row 24, going back to the 6 R20, 4 R16, 2 R12, ending at the 0 R8.
5: The last connects the middle 4 of Row 24, to 2 R20 and ends at 0 R16.
I promise it's easier once you start doing in than all that above talk makes it sound. Once the students get the rhythm going it will be easy to keep the pattern.
Now repeat backwards! Starting at the top 10 of Row 20.
1: 10 R20 to 8 R24.
2: 10 R12 to 8 R16, to 6 R20, ending at 4 R24.
3: 10 R4 to 8 R8, to 6 R12, to 4 R16, to 2 R20, ending at the 0 R24.
4: 8 R0 to 6 R4, to 4 R8, to 2 R12, ending at 0 R16.
5: The Last! 4 R0 to 2 R4, ending at 0 R8.
Draw past the 24 row to create the tabs.
Now you can decorate! We used prismacolor pencils and construction paper crayons. Stay clear or markers, it makes the paper too soft!
The kaleidocycles has 4 rows for decorating and a 5th half row where it glues together.
For the best results repeat the same pattern across each row.
When finished, cut off extra paper.
Fold along all the diagonal lines.
Both directions.
Then fold along all the vertical lines, paper fan style.
If folded right it will easy roll into a tube, connecting the 1st over the 5th row.
Once the tube is glued together, we used a glue gun to quicker results, you insert the tabs into the open end to form a circle.
Let dry well before trying to spin or it will pop open!
Now enjoy!


